© 2016, David Brooks

Measuring Particulates in the Air Using Inexpensive Sensors

(Supported by the Toyota USA Foundation through IESRE's Facilitating Environmental Science Inquiry and Research for Students and Educators project)


      NOTE: This is a preliminary description of using Arduino microcontrollers and inexpensive sensors to count particulates in the atmosphere. I have put it online not because it is finished (I haven't included any data yet), but because there has been a lot of interest in this project. Please provide feedback!
      I should also note that although I have written my own code and designed my own setup for a fan-aspirated particle counter, a great deal of work is already available online about these sensors – see the References section at the end of the document.


Particulates are small particles, roughly one to a few tens of micrometers in size, suspended in the air. They are individually invisible but in large concentrations, they may give a "color" to the atmosphere. The extent to which particulates are present in the atmosphere are an important indicator of air quality. They come from multiple sources, natural and manmade.

Sourceapproximate size range
cigarette smoke1 µ
pollen10 µ
windblown dust10 µ

      The health hazards of particulates depends on their composition and size. The smaller the particle, the deeper it can penetrate into the lungs when breathed in. In order of increasing health concern:       Many countries, including the U.S., have established standards for concentrations of two particle size ranges, <=2.5µ (PM2.5) and >2.5µ to 10µ (PM10), as components of an Air Quality Index (AQI).
      Commercial particle detectors operate on two different principles:

(1) Drawing a known volume of air through a filter and weighing the particulates collected on the filter;
(2) Shining a laser through a chamber where air is flowing and examining the effects of light scattering by particulates flowing through the chamber.

These detectors are expensive, ranging in price from a few hundred dollars to thousands of dollars. Are there less expensive alternatives that will still provide usable data? There are three possibilities of which I am aware, from Sharp (GP2Y1010AU0F), Shinyei (PPD42NS), and Amphenol/Telaire (SM- PWM-01A). These all work on the same principle. Light from a near-IR LED shines into a small chamber through which air is flowing. When a particle passes through the chamber, it scatters light from the LED and some of that scattered light is focused on a photodetector, which generates a brief voltage pulse.
(Image from HERE.)

      Any of these inexpensive sensors (~$20) can be interfaced with an Arduino microcontroller. I have tested the Sharp and Amphenol/Telaire sensors and have concluded that the Amphenol/Telaire sensor is the best choice for a particulate sampling project. Unlike the Sharp sensor, which requires an external capacitor and resistor, the Amphenol/Telaire does not require any external components. It is readily available in small quantities from a reputable U.S. electronics distributor (www.mouser.com). The Shinyei sensor is similar to the Amphenol/Telaire sensor, but there are problems with its source. This sensor was designed for use in some appliances by a Japanese firm which does not serve the retail market. The sensor is available through a Chinese company which has apparently reverse engineered and manufactured this product without authorization. I would rather not deal with such a product. It is possible that the Amphenol/Telaire sensor is also modeled after the Shinyei, but at least it is not a blatant copy of that sensor.
      All three of these inexpensive sensors are intended for indoor use. The Amphenol/Telaire and Shinyei sensors include a resistor near the bottom air intake port. The resistor is heated by the current flowing through it, thereby generating a convection current which moves air upward through the chamber. For indoor use, the sensor can be used as-is, mounted vertically. For outdoor use, I believe it is necessary to actively draw air through the sensor chamber with a small fan. If this is done, the heater resistor can simply be broken or cut. (I didn't have any luck trying to unsolder it from the pc board.) This isn't necessary, but the reduced power requirement may be significant if this device is used outdoors with a fan and an Arduino powered by a battery supply. For consistency, probably it is a good idea to use a fan for both indoor and outdoor use.
      The Amphenol/Telaire sensor can be powered from the +5V pin on an Arduino Uno. The current draw given in the specifications is "<100 mA," a current which is at least twice as high as should be drawn from an Arduino digital pin, possibly even with the heater resistor removed. (I haven't tested the current draw with and without the resistor.)
    The Amphenol/Telaire sensor requires code which can detect negative pulses generated when particulates scatter light toward the photodetector. This might seem to be a difficult coding problem, but the Arduino language includes a function, pulseIn(), which detects voltage pulses and measures their length – exactly what is needed. Over a fixed sampling time, 30 seconds recommended, the ratio of the total length of all pulses detected to the sampling time, the "pulse occupancy ratio," is then a measure of the number of particulates passing through the sensing chamber.

      This measurement technique can in some sense provide the basis for a calibration in terms of particulates/m3 or, with assumptions about the composition of particulates, µg/m3 (the units specified by the EPA for calculating the particulate contribution to the Air Quality Index. The Amphenol/Telaire sensor has outputs for measuring "small" and "large" particulates, but the actual size distribution of particulates being measured is unknown. The spec sheet claims the ability to measure a minimum particle size down to 1µm, which it describes as an "average dust size" for cigarette smoke. It describes "house dust" as having an average size of 20µm. A graph relating P1 (small particle) output characteristics to cigarette smoke particulate concentration is given in the application notes for the sensor, but there is no graph for P2 (large particle) output. Indeed, even the $300 Dylos DC1100 particle counter, which is a true laser counter, only separates "small" and "large" particles, although the "large" particle output is allegedly calibrated to measure particulates 2.5 µ and above.
      Based on the manufacturer-supplied image below, it is clear that the Amphenol/Telaire sensor cannot consistently count individual particles. This sensor, which depends on measuring the length of voltage pulses, cannot differentiate between one large particle and some collection of two or more large and/or small particles overlapping in their passage through the chamber. Based on the description of how pulses are generated, it seems like a good idea to write code that captures information about the length of pulses detected as well as the number of pulses. The "pulse occupancy" percent, as defined in the sensor's data sheet, is a conflation of the number of pulses and the "size" of individual or "clumped" particles. As a result, it is not possible definitively to separate number and size.

      Considering how these devices work, "calibrations" must be considered to be only approximations. It may be worth trying to calibrate these sensors relative to PM2.5 or PM10 data from an "official" air quality reporting site. But, in the end, it may be that these sensors are useful only in some relative sense, providing information about how particulate concentrations vary in space and time without providing absolute particle counts within well-defined size ranges. This limitation in no way detracts from the value of the data they can provide.
   
Amphenol/Telaire SM- PWM-01A Dust Sensor
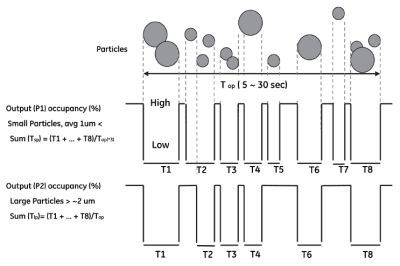
      I have replaced the 5-pin connector which came on this sensor with a 4-pin male header for a cable I happened to have on hand. Pin 5, the leftmost pin, is not used. From right to left,

pin 1: GND
pin 2: P2 signal out (large particulates, 3-10 µm)
pin 3: +5V
pin 4: P1 signal out (small particulates, 1-2 µm)
pin 5: (not used)

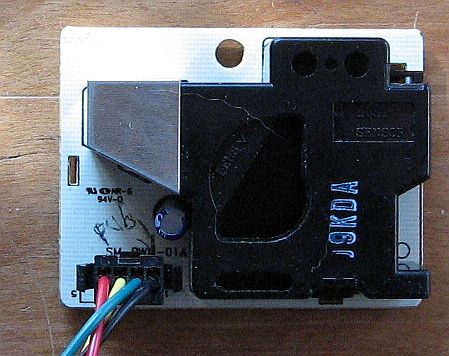
Setting Up the Amphenol/Telaire Sensor for Outdoor Particulate Monitoring
      As noted above, I believe this sensor should be fan-aspirated when used outdoors. I mounted the sensor at one end of a 2" Schedule 40 45° PVC elbow, readily available from home supply stores. To do this I cut a disk from 1/8" plywood, as shown in the lefthand image. I cut through the disk to expose the lower air input port and the entire chamber. The disk blocks the original air output ports at the top of the device. I cut a new output port with a drill and Dremel tool in the top of the sensor housing. Then I attached the sensor to the disk and the disk to one end of the PVC elbow with silicone caulk, as shown in the rightmost image.

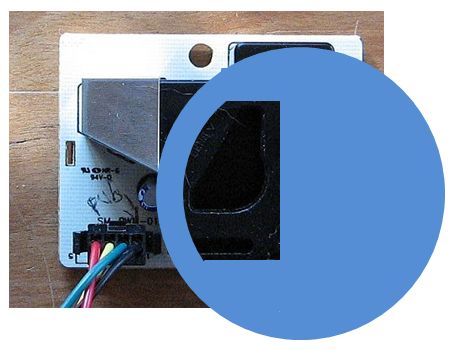
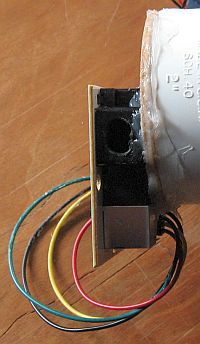
To force air through the sensor, I used a a 60mm-diameter 5V fan from the surplus electronics supplier www.allelectronics.com, described as used equipment removed from laptops (CAT# CF-444U, $2.00 each). This fan draws 0.15A at 5V. It will also run a little more slowly from the 3.3V Arduino Uno supply pin, which is OK for this application even with the sensor powered from the +5V pin. (These two pins can safely supply a total of several hundred milliamps.) This fan is an ideal choice for this project but, as is always the case with used surplus products, there is no guarantee that it will be available in the future.
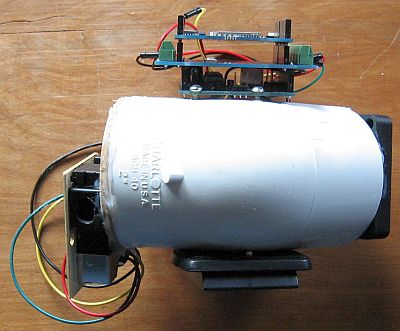
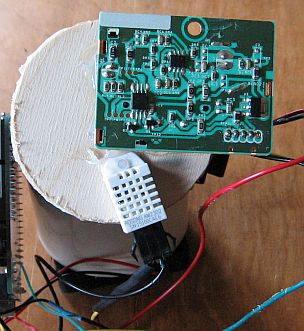
      The entire assembly is shown here. The fan is mounted at the other end of the elbow with silicone caulk. Air flows from the fan toward the sensor. I drilled and tapped a 1/4"-20 hole in the elbow for mounting on a standard camera tripod and, on the other side, two drilled and tapped holes for fastening the Arduino Uno board assembly with 1/2" 4-40 machine screws. The Arduino board assembly includes a screw shield (RB-lte-127, robotshop.com) and datalogging shield (adafruit.com, ID 1141).
      Finally, I fastened a DHT22 temperature/relative humidity sensor to the plywood disk with silicone caulk. The 10kΩ pullup resistor required to interface the DHT22 T/RH sensor with the Arduino Uno is wired between the red and yellow wires on the cable, covered by the the black tubing.

   
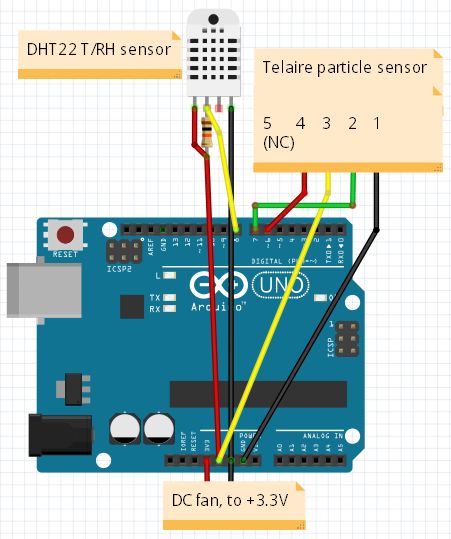
Here is the wiring layout for this device. The wire colors coming from the Amphenol/Telaire sensor correspond to the colors on the 4-pin connector/cable I used for this project.

Code for the Amphenol/Telaire Particulate Counting Project
      Here is the Arduino code for this project, TelaireDustSensor.ino, which can be downloaded as a text file HERE. The code monitors output from the two Amphenol/Telaire output channels and it saves to an SD card data collected during 30 seconds for each channel:

• the date and time, plus the day and time expressed as a fraction (day + hours/24 + minutes/1440 + seconds/86400),
    which I prefer as an x-axis unit rather than using date/time labels.
• the number of pulses and pulse occupancy, %.
• the minimum, average, and maximum pulse duration, µs.
• the temperature (°C) and relative humidity (%).

Using the Arduino code:
      Although it is a good idea to develop some programming skills for using Arduinos, in principle this code can be used "as is" without any previous programming experience. However, you will need, as a minimum, the free Arduino IDE (integrated development environment) which can be downloaded HERE. You will also need to download libraries for the real time clock on the datalogging shield and the T/RH sensor. (The library for the SD card should be included in the original download.) If you have no experience with Arduinos at all, you will need to look online for instructions for installing and using libraries.
      Once Arduino code, called a "sketch," is successfully compiled and uploaded it will reside permanently in memory, even when the power is off, until it is changed or replaced. The first time the sketch is executed, the SD card setup function, starting in line 147, will create a file named LOGGER00.CSV on your SD card, as defined in line 29. Thereafter, every time you stop and restart the sketch (by removing and providing power), new files, named LOGGER01.CSV, LOGGER02.CSV, etc., will be created, up to LOGGER99.CSV. File names are restricted to 8 characters plus a 3-character file extension, and they are always saved with uppercase letters, regardless of how they are spelled. The CSV extension means that the code creates comma-separated data lines so the files can be opened directly in Excel. These files do not have creation date/time stamps associated with them. You can, of course, copy or move the files to your computer and rename them, at which point they will have date/time stamps.


Using a Dylos DC1100 Pro Air Quality Monitor with PC Interface

      As mentioned above, some more expensive particle counters use light scattered from a laser to count particles passing through a chamber. One device which is suitable for use with an Arduino is the Dylos DC1100 Pro monitor, which costs about $300. The product website provides this description:


A battery-powered model, the DC1700, is also available, but it costs over $400.
      Both these models include a serial interface. For this project I have chosen the DC1100 Pro. Dylos provides software for accessing data through the serial port, but this software is irrelevant for use with an Arduino. But, with just a little effort, the Dylos can be interfaced with an Arduino Uno. You will need an RS232 serial port to TTL converter to talk to your Arduino. I used the PRT-0049 RS232 shifter from Sparkfun. You will also need either a 9-pin null modem cable or a standard 9-pin serial cable with a 9-pin M/M null modem adapter; these items are widely available from online sources such as monoprice.com or cyberguys.com. Make sure you get the required pin orientation. The Dylos automatically send output to its serial port at one-minute intervals.


Other display possibilities

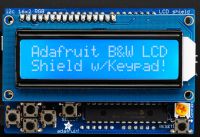
      It is easy to add an LCD to display particle count outputs using a $20 ID 772 white-on-blue LCD from www.adafruit.com. This display requires only 2 pins to control it, so it is easy to add to existing projects. It has a programmable keypad so you can write code to change what is being displayed. There is also a version with a programmable multicolor background so you could assign different color backgrounds to different particle levels. Both these devices require some assembly.

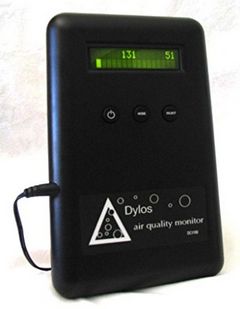
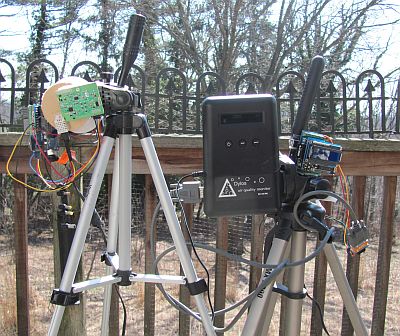
An experimental setup for comparing Amphenol/Telaire and Dylos outputs is shown here. The fan-aspirated Amphenol/Telaire sensor with a DHT22 temperature/relative humidity sensor is on the left, connected to an Arduino with a datalogging shield. The Dylos in the middle of the photo is connected through its serial port to another Arduino, with its output logged and (optionally) displayed on an adafruit.com LCD. I epoxied a piece of 1/4" lucite, with a 1/4"-20 tapped hole, on one side of the Dylos case so I could mount it on a camera tripod.

References:
Amphenol/Telaire Applications
Amphenol/Telaire Spec Sheet
Engineering Toolbox
AirNow
EPA "Build Your Own Particle Sensor"
Using the Sharp sensor
Using the Amphenol/Telaire sensor
Interfacing the Dylos DC1100 with Arduino